
This was originally a tutorial that was given at the 2014 Bay Area Science Festival. Let us know if you have any improvements to it or if you have a successful workshop!
Workshop Focus:
Lesson explores computer programming and the impact of computers on better understanding of our environment. Workshop participants build and test a boat that uses hardware and software to send temperature readings using an Arduino board. They connect the hardware, program the code, test their system, customize it (with different sample times, team names, etc), evaluate their results, and watch the data posted live to a map and twitter.
Workshop Synopsis
The ” National Geographic Explorer Water Sensor Challenge” lesson explores how computer and software engineers can help us better understand the world around us. Participants work in teams to set up and program an Arduino board to take a reading from a temperature sensor and send that reading over SMS. Teams build their system, program and test it, reflect on the challenge, and deploy the sensors into the Bay.
Preferred Age Levels
Core team of ages from 12-18, however younger/older team members could help with some of the process (decorating the boat, etc.).

Objectives
- Understand the need to know more about our environment.
- Learn about engineering design/redesign and open source
- Learn about circuits, computers, and software coding.
- Learn about the importance in engineering to help solve Earth’s challenges.
- Learn about teamwork and problem solving.
Resources/Materials
Prices for the electronics reduce with greater volumes of purchases. All necessary soldering will be done before the workshop so hardware just involves simple connections with breadboard. Code for the functions will be created in advance (including lessons on rationale behind that code) to help teams that have issues in determining the correct code.
- This document, associated lesson plans (currently drafting), reference sheets (currently drafting)
- Sample code for both sensor reading and printing/sending via SMS
- Arduino microcontroller: http://www.adafruit.com/products/849 ($24.95)
- GPRS (SMS) Arduino shield: http://www.seeedstudio.com/depot/GPRS-Shield-V20-p-1379.html ($59.90)
- Prepay SIM card (T Mobile): $25
- Waterproof digital temperature sensor and 4.7k pullup resistor: http://www.adafruit.com/products/381 ($9.95)
- Half-size breadboard: http://www.adafruit.com/products/64 ($5.00)
- Battery holder: http://www.adafruit.com/products/248 ($5.00)
- AA batteries (6 per sensor)
- Jumper wires
- Plastic boat body: http://www.containerstore.com/shop/closet/storageBoxesBins/viewAll?productId=10003253 ($1.79)
- Miscellaneous paper decorations for the boat, rope to deploy/retrieve
- Computers per team to do the coding and uploading
- Large screen to watch the twitter update real-time (connected to my laptop)
Project Inspiration
Via here: http://newswatch.nationalgeographic.com/2014/08/20/open-source-okavango14-the-heartbeat-of-the-delta/
Shah Selbe is the Project Technologist that is responsible for the design and development of the environmental monitoring platforms for the Okavango Wilderness Project, a collaborative project amongst a number of National Geographic Explorers. During the 2014 expedition, three prototype open source sensor platforms were deployed to test the ability for sensors to directly measure and report these environmental parameters. These platforms are currently collecting daily measurements of temperature, pH, and conductivity and sending the data to the Into The Okavango website via SMS. The lessons learned from these deployments and their integration with www.intotheokavango.org have influenced the need for a next generation of sensors to be deployed and linked to the public API in 2015. For 2015, fifty of these platforms will be deployed at various points during the expedition.
This workshop allows future engineers and scientists to repeat the work that we are doing with National Geographic to protect one of this planet’s greatest environmental resources, Botswana’s Okavango Delta.
Procedure
- Show students the participants reference sheets and final completed platform.
- Conduct primer to open source computing including:
- Background about Okavango14 (2 mins)
- Introduction to engineering for helping our planet (5 mins)
- Introduction to Arduino (5 mins)
- Organize teams and pass out workshop plans. Explain process.
- Participants set up their Arduino, build circuits, program it and test it until it meets the challenge. (60 mins)
- Participants place systems in the boat and decorate accordingly. (20 mins)
- Teams deploy sensors into the Bay, watch screen for the sensor readings to come up real-time on the twitter. (remaining time)
- Retrieve sensors using tether. Shah to later deploy sensors in the LA River to allow for continued updates.
- Teams reflect on the challenge, and present their experiences to the class. (5 mins)
- Buffer time?
Set-up computer software
Download necessary software:
Software
- Arduino Development Environment 1.0.6: http://arduino.cc/en/main/software
- OneWire Arduino Library: http://www.pjrc.com/teensy/td_libs_OneWire.html
- DallasTemperature Arduino Library: http://milesburton.com/Dallas_Temperature_Control_Library
Unzip the OneWire and DallasTemperature archives and copy them into your Arduino libraries folder.
For Windows users:
My Documents -> Arduino -> libraries
Mac users:
<home directory> -> Documents -> Arduino -> Libraries
Then restart the Arduino software.
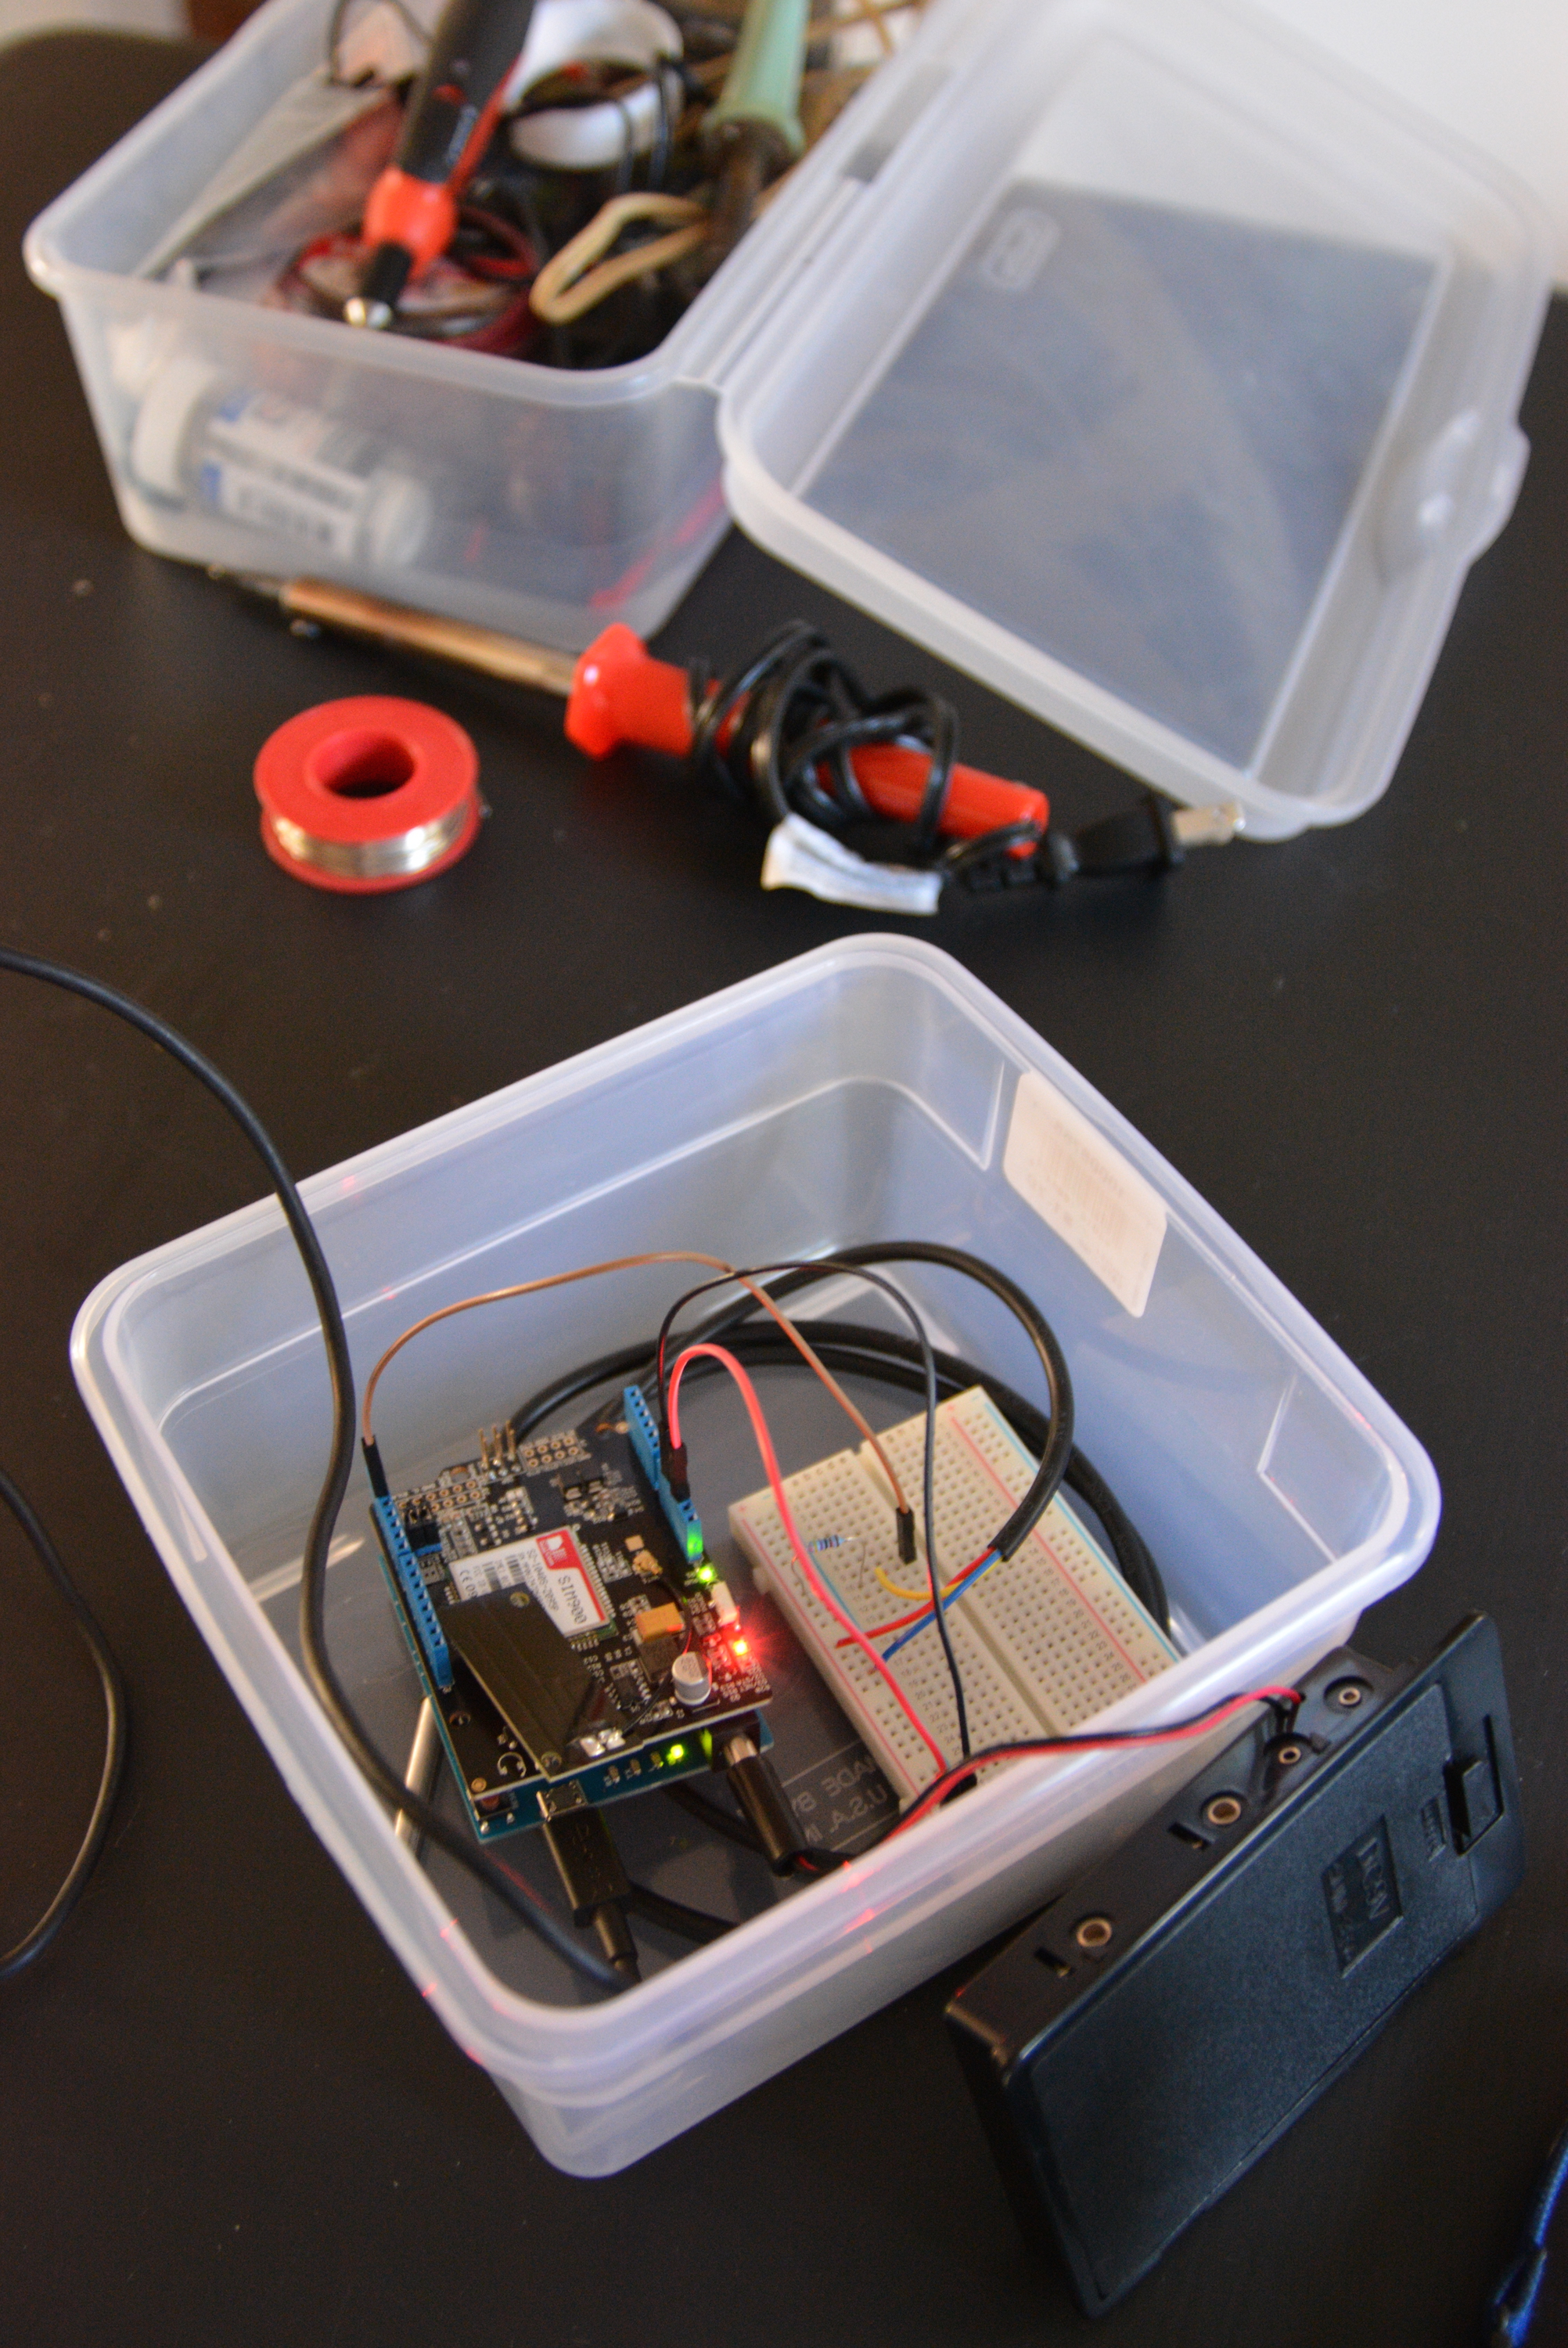
Start building circuit
The parts necessary are:
- Arduino Leonardo microcontroller
- GPRS (SMS) Arduino shield
- Prepay SIM card (T-Mobile)
- Dallas Semiconductor DS18B20 One-Wire Temperature Sensor
- 7k pullup resistor
- Half-size breadboard
- Battery holder
- AA batteries (6 per sensor)
- Jumper wires
- Plastic boat body
- Miscellaneous paper decorations for the boat, rope to deploy/retrieve
- Computers per team to do the coding and uploading
Explain all the part and what they do.
Explain the history of the Arduino.
Start assembly of units
- Place parts in front of the teams in the work area to be able to identify everything
- Put SIM card in the back of the GPRS shield
- Carefully place the GPRS shield onto the Arduino (pins connect easily on-top of each other)
- Use the breadboard to connect the temperature sensor, resistor, Arduino-GPRS combination, and resistor

- Place batteries in battery holder (but do not connect to the Arduino yet)
- Plug in the USB cord into the Arduino and the computer
Build the boat
- Thread the temperature sensor through the lid of the boat
- Place decorations into the boat housing
- Place the parts into the boat, but allow access to the USB plug and power port
- Tie rope onto lid for deployment and retrieval
Start coding
Open the Arduino IDE for uploading the code to the Arduino.
- Connect the Arduino through the correct port and Arduino board


- Check to make sure that the Libraries are loaded into the IDE

- Explain the software coding philosophy
- Generic Arduino sketch program architecture “What is a sketch”
- Look at code examples (back of this document)
- Upload ino to test to make sure that the temperature sensor is reading
- Upload ino to test to make sure the Arduino can SMS a pre-defined message
- Upload ino to take temperature reading and send it with team name
- Open ino in IDE
- Explain how the program works
- Open Serial Monitor to see the temp sensor reading


- Open ino in IDE
- Explain how the program works
- Make custom message for each team
- Send to Arduino, watch @NGExploreSensor for message
- Open ino in IDE
- Explain how the program works
- Make custom message for each team
- Send to Arduino, watch @NGExploreSensor for message
- Plug in battery pack
Deploy boats
- Place lid on the boats
- Walk them over to the water
- Hold on to end of rope and deploy
- Tie rope end to something to not lose the boat
- Watch the readings come in on @NGExploreSensor twitter

Open Source Computing
Arduino is an open-source physical computing platform based on a simple microcontroller board, and a development environment for writing software for the board. Arduino can be used to develop interactive objects, taking inputs from a variety of switches or sensors, and controlling a variety of lights, motors, and other physical outputs. Arduino projects can be simple — such as turning on and off a light — or very complex. The boards can be assembled by hand or purchased preassembled; the open-source software can be downloaded for free. The Arduino software runs on Windows, Macintosh OSX, and Linux operating systems.
Computer Programming
Computer programming (often shortened to programming or coding) is the process of designing, writing, testing, debugging, and maintaining source code of computer programs. The code can be written in many different programming languages. Programming is basically a set of instructions that a computer or other device uses to perform a task — it might be turning on a light, opening a door, or writing a document.
Arduino Development Environment
The Arduino development environment or software contains a text editor for writing code, a message area, a text console, a toolbar with buttons for common functions, and a series of menus. It connects to the Arduino hardware to upload programs and communicate with them. Software written using Arduino is called a “sketch.” These sketches are written in the text editor. Sketches are saved with the file extension .ino. There are features for cutting/pasting and for searching/replacing text. The message area gives feedback while saving and exporting and also displays errors. The console displays text output by the Arduino environment including complete error messages and other information. The bottom right hand corner of the window displays the current board and serial port.
Arduino code
temperature.ino
// This Arduino sketch reads DS18B20 “1-Wire” digital
// temperature sensors.
// http://www.hacktronics.com/Tutorials/arduino-1-wire-tutorial.html
#include <OneWire.h>
#include <DallasTemperature.h>
// Data wire is plugged into pin 2 on the Arduino
#define ONE_WIRE_BUS 2
// Setup a oneWire instance to communicate with any OneWire devices (not just Maxim/Dallas temperature ICs)
OneWire oneWire(ONE_WIRE_BUS);
// Pass our oneWire reference to Dallas Temperature.
DallasTemperature sensors(&oneWire);
void setup(void)
{
// start serial port
Serial.begin(9600);
Serial.println(“Dallas Temperature IC Control Library Demo”);
// Start up the library
sensors.begin(); // IC Default 9 bit. If you have troubles consider upping it 12. Ups the delay giving the IC more time to process the temperature measurement
}
void loop(void)
{
// call sensors.requestTemperatures() to issue a global temperature
// request to all devices on the bus
Serial.print(“Requesting temperatures…”);
sensors.requestTemperatures(); // Send the command to get temperatures
Serial.println(“DONE”);
Serial.print(“Temperature for Device 1 is: “);
Serial.print(sensors.getTempCByIndex(0)); // Why “byIndex”? You can have more than one IC on the same bus. 0 refers to the first IC on the wire
}
textmessage.ino
// This Arduino sketch reads DS18B20 “1-Wire” digital
// temperature sensors.
// http://www.hacktronics.com/Tutorials/arduino-1-wire-tutorial.html
#include <SoftwareSerial.h>
SoftwareSerial SIM900(7, 8);
void setup()
{
SIM900.begin(19200);
SIM900power();
delay(20000); // give time to log on to network.
}
void SIM900power()
// software equivalent of pressing the GSM shield “power” button
{
digitalWrite(9, HIGH);
delay(1000);
digitalWrite(9, LOW);
delay(5000);
}
void sendSMS()
{
SIM900.print(“AT+CMGF=1\r”); // AT command to send SMS message
delay(100);
SIM900.println(“AT + CMGS = \”+13239994470\””); // recipient’s mobile number, in international format
delay(100);
SIM900.println(“Hello, world. This is a text message from an Arduino.”); // message to send
delay(100);
SIM900.println((char)26); // End AT command with a ^Z, ASCII code 26
delay(100);
SIM900.println();
delay(5000); // give module time to send SMS
SIM900power(); // turn off module
}
void loop()
{
sendSMS();
do {} while (1);
}
SMStemp.ino
// This Arduino sketch reads DS18B20 “1-Wire” digital
// temperature sensors.
// http://www.hacktronics.com/Tutorials/arduino-1-wire-tutorial.html
#include <SoftwareSerial.h>
#include <String.h>
#include <OneWire.h>
#include <DallasTemperature.h>
String textForSMS;
float currentTemp;
SoftwareSerial mySerial(7,8);
#define ONE_WIRE_BUS 2
OneWire oneWire(ONE_WIRE_BUS);
DallasTemperature sensors(&oneWire);
void setup()
{
mySerial.begin(19200); // the GPRS baud rate
Serial.begin(19200); // the GPRS baud rate
Serial.println(“test”);
delay(500);
sensors.begin();
}
///SendTextMessage()
///this function is to send a sms message
void SendTextMessage(String message)
{
mySerial.print(“AT+CMGF=1\r”); //Because we want to send the SMS in text mode
delay(100);
mySerial.println(“AT + CMGS = \”+13239994470\””);//send sms message, be careful need to add a country code before the cellphone number
delay(100);
mySerial.println(message);//the content of the message
delay(100);
mySerial.println((char)26);//the ASCII code of the ctrl+z is 26
delay(100);
mySerial.println();
}
String AppendFloat(String oldString, float num)
{
char buf[20];
char* string = dtostrf(num, 4, 2, buf);
oldString.concat(string);
return oldString;
}
void GetTemp(float reading)
{
sensors.requestTemperatures();
currentTemp = sensors.getTempCByIndex(0);
}
void loop()
{
Serial.println(“Trying…”);
GetTemp(currentTemp);
currentTemp = sensors.getTempCByIndex(0);
textForSMS = “Team SF Temp (deg C) reading is “;
textForSMS = AppendFloat(textForSMS, currentTemp);
Serial.println(“Message:”);
Serial.println(textForSMS);
SendTextMessage(textForSMS);
delay(300000);
Serial.println(“Done waiting”);
}
void ShowSerialData()
{
while(mySerial.available()!=0)
Serial.write(mySerial.read());
}
Notice: Trying to get property of non-object in /var/www/vhosts/conservify.org/httpdocs/wp-includes/comment-template.php on line 671
Notice: Trying to get property of non-object in /var/www/vhosts/conservify.org/httpdocs/wp-includes/comment-template.php on line 28
Notice: Trying to get property of non-object in /var/www/vhosts/conservify.org/httpdocs/wp-includes/comment-template.php on line 47
Leave A Comment Cancel reply